What you will need:
- Your HandiTread
- Clear liquid silicone (OPTIONAL)
- 3/16” drive pin anchors
- 3/16” masonry drill bit
- A hammer
- A power or hammer drill
Instructions:
- Once you have acquired all of the necessary materials, align the tread in the desired position. If you are installing a nosing, make sure that it fits snugly at the edge of the stair. If you are installing a tread, set it back roughly ½” from the edge. Using a marker and the tread as a template, place a dot in each of the pinholes to mark the placement of the drive pins on the concrete surface. Note that the pinholes are not raised, DO NOT use the raised traction bumps for your pin placement.

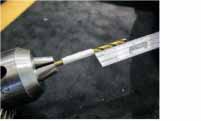
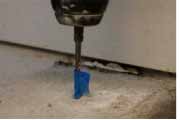
- Remove the tread from the stair. Using a 3/16” masonry drill bit and your hammer/power drill at each marked spot, drill a hole into the concrete deep enough to accommodate the length of the concrete drive pin you are using. Make sure that you are drilling perpendicular to the surface. Use caution when drilling the holes. If the concrete is not in good condition or you are drilling too close to the edge, the concrete can fracture. This would prevent you from using this location and will necessitate the need to relocate the tread. To ensure that you are drilling deep enough, attach a piece of tape to the drill bit at the height of your screw. For example, if you are using a pin that is ¾” long, attach the tape ¾” above the tip of the bit.
In the picture below, the tape has reached the surface, indicating that the hole is at the perfect depth.